Intro #
This post will go over the hardware, software, and networking I use in my enterprise-esque home network.
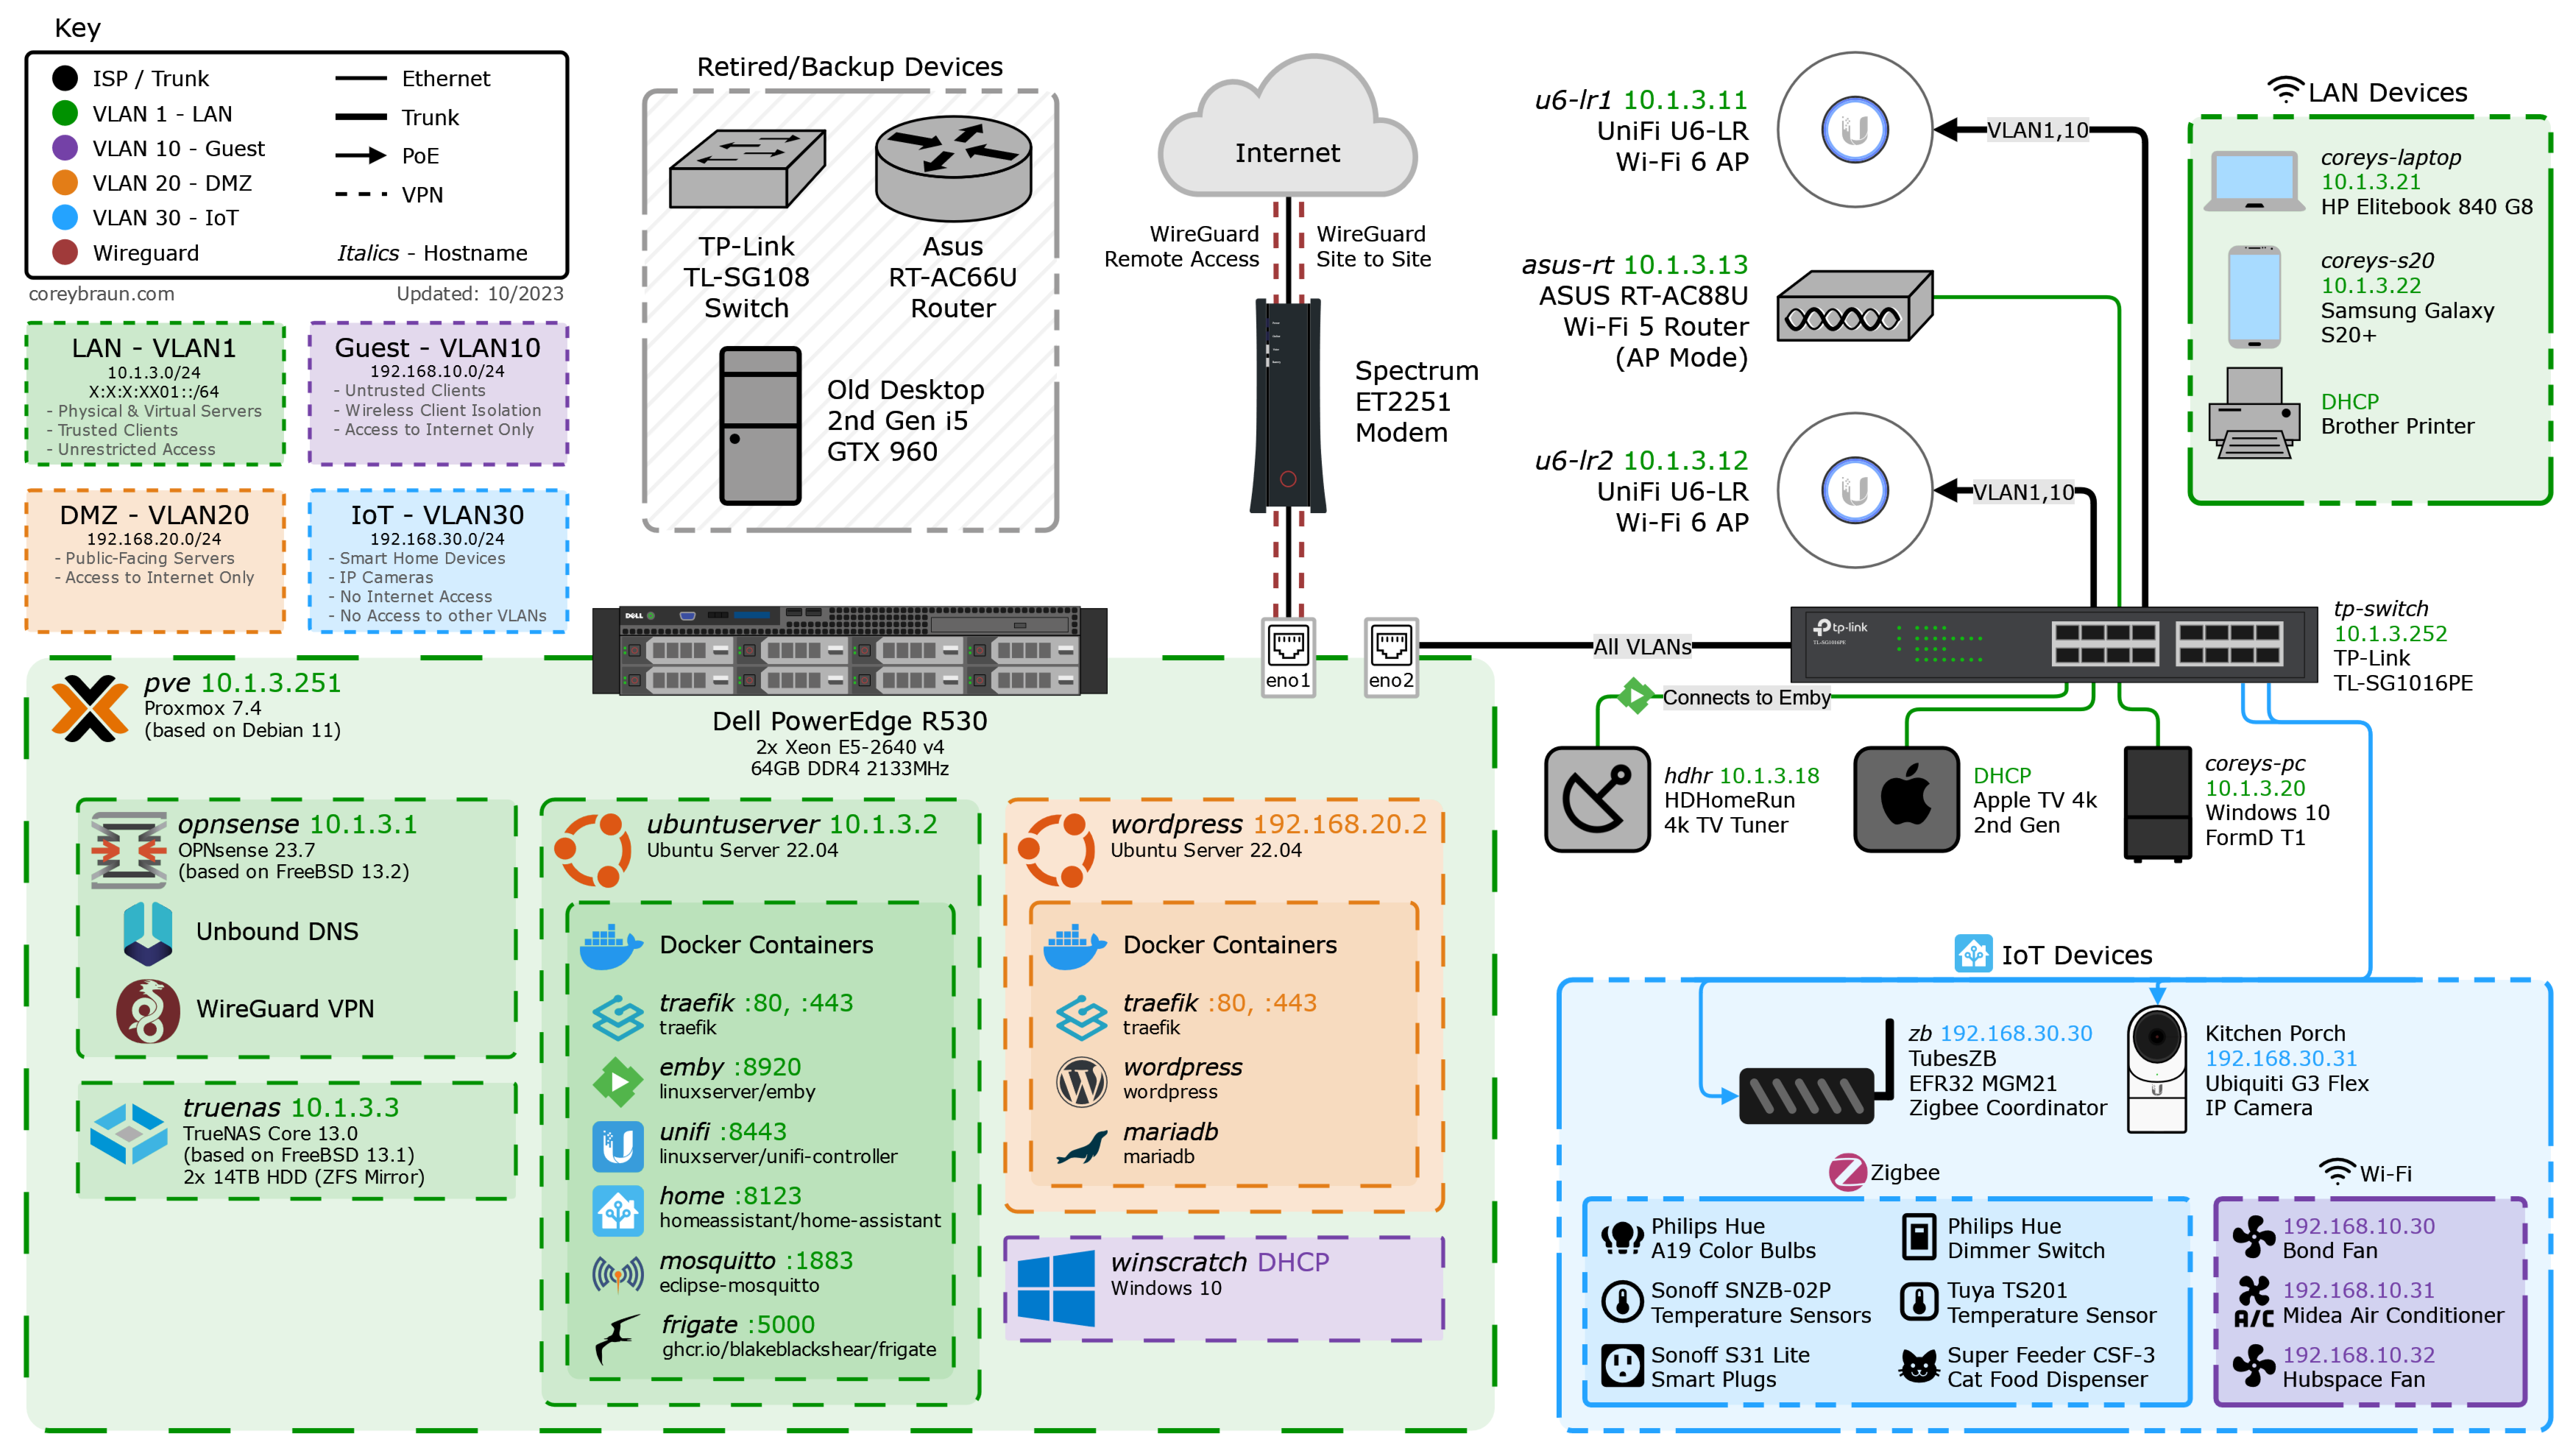
The network diagram below provides a visual representation of my network’s topology. Following the diagram is a detailed write-up on almost everything pictured, so read on if anything catches your eye.
This is a lengthy post, so feel free to skip around using the table of contents.
Network Diagram #
Making of #
This was created using online diagramming app draw.io.
You can download the importable XML diagram file here.
SVG Asset packs used:
- loganmarchione/homelab-svg-assets
- jgraph/drawio-libs
- Material Design Icons
- svgrepo.com
- vectorlogo.zone
SVG Assets I created using Inkscape:
Inspiration from:
Hardware #
Dell PowerEdge R530 #
This is my primary (and currently only) physical server. It’s a 2U server running Proxmox and several virtual machines, both of which are covered further in the Software section.
After buying this server used, I upgraded and added several parts, leading to its current specs:
- 2x Intel Xeon E5-2640 v4 (10c/20t, 2.4/3.4GHz) CPUs
- 64GB (8x8GB) Samsung DDR4 2133MHz Registered ECC RAM
- 2x 2TB Samsung SATA SSDs (ZFS mirror with proxmox install and VM disks)
- Dell PERC H330 Mini RAID Controller (Connected to 8 drive backplane; Flashed to HBA330 firmware and passed through to TrueNAS VM)
- 2x 14TB Shucked Western Digital Elements HDDs (ZFS mirror in TrueNAS)
- 2x 500w OEM PSUs (redundant)
- Mini PCIe Google Coral TPU (passed through to Ubuntu Server VM, used by Frigate)
With redundant PSUs and drives, this machine is built to survive common hardware failures. Additionally, it is plugged into an Uninterruptible Power Supply for protection during brownouts and power outages.
TP-Link Switch #
My primary switch is a TP-Link TL-SG1016PE.
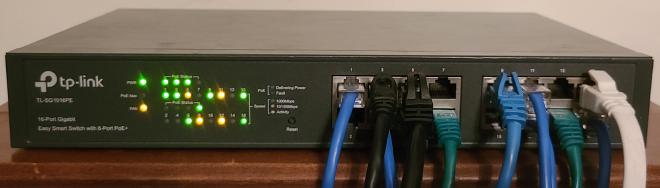
This is a 16 port layer 2 gigabit switch supporting several important features:
- 802.1Q VLANs
- 8 Power over Ethernet (PoE) Ports supporting 802.3af/at (15W/30W per-port output) with a 150W total power budget
- Link Aggregation Groups (LAG)
Supporting VLANs is standard for any “managed” switch, but it still seems pertinent to mention it. Virtual network segmentation means you don’t have to use a different cable, switch, and port for each subnet you want to keep separate, rendering it essential in all but the simplest networks.
PoE is another switch feature that’s almost essential in my network. Providing power to devices over their already required network connection is much less messy cable-wise, and for some devices, required. In my current setup my Ubiquiti APs, IP cameras, and Zigbee coordinator all get power over ethernet from this switch. While I don’t have a need for it currently, I do wish my switch supported 802.3bt PoE. This newer PoE standard allows ports to supply a maximum of 60-90W of power by sending power over all four twisted pairs. The higher power output could be useful for providing power to another switch, which then distributes it to several other PoE devices.
The last feature on my list, LAGs, is one that I haven’t used yet, but plan to someday. Being able to logically group multiple ports to act as a single interface would allow for a higher bandwidth connection from my switch to my server, which could be useful since my switch has only gigabit ports. Since almost all other devices connected to my switch are typically sending their packets to my server, the current single gigabit uplink is a potential bottleneck. That bottleneck hasn’t been a problem thus far, but if I switch to a different storage setup on my NAS with higher r/w speeds, I plan to implement a LAG between my switch and server to ensure file transfers don’t use up all my network bandwidth.
Besides a basic implementation of QoS, the features above are about all my switch can do. It gets the job done, but since I’ve studied for and gotten a Cisco networking certification (CCNA) since buying this switch, it now feels a bit limited. If it weren’t for the high price (or power usage, in the case of used enterprise gear with a lower up-front cost) of Cisco gear, I’d probably want one of their switches for my home network in the future.
Cabling #
Since my house doesn’t have existing network infrastructure, I typically have to run my own cables when connecting devices to my network. I use solid copper Cat 5e ethernet cable, which I terminate to the T568B standard. Since the majority of devices on my network support a maximum of 1000BASE-T (1Gbps), Cat 5e cabling meets my needs. It also supports 2.5GBASE-T (2.5Gbps), which I may use in the future as a cheaper alternative to 10 gigabit networking.
Wireless Access Points #
For Wi-Fi in my house, I primarily use two UniFi U6-LRs from Ubiquiti. This pair of Wi-Fi 6 APs are connected to my UniFi Controller docker container, which allows for easy management and troubleshooting of my WLAN.
While I like these APs, they’re not free of problems. Despite having “Long Range” (LR) in the name, these APs have a less-than-impressive range. For this reason, I ended up having to use an old consumer router in AP mode to fix a Wi-Fi dead zone between the two APs, which you can read more about here.
Client Devices #
When I’m connecting to my network, it’s usually via one of 3 devices: My Windows desktop, Linux laptop, or Android phone.
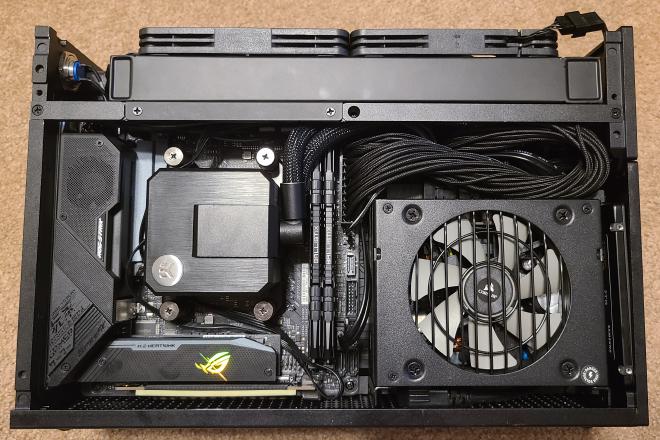
Windows Desktop #
My desktop is a Small Form Factor (SFF) PC in a sub-10 liter case - the FormD T1. I use it primarily for working on projects like this one, as well as playing online games with my friends. Here’s the full parts list for my PC and peripherals, as well as a picture inside the case:
From this machine I normally use PuTTY to SSH into my Linux or FreeBSD VMs, where I’m typically editing config files or writing scripts/YAML/Dockerfiles with Vim. For projects with lots of files I need to swap between, like this website, I use VSCode over SSH (with a Vim extension, of course).
Linux Laptop #
My laptop is an HP Elitebook 840 G8 with an i5-1135g7 and 16 gigs of RAM. Since it’s a business laptop, it’s built to last (unlike many thin-and-lights), and fortunately also has great repairability.
On this laptop I run Xubuntu, an Ubuntu-based linux distro with the Xfce desktop environment. This is actually the OS I used on my very first computer when I was 9, so I’m quite comfortable with it. While using linux on a laptop does come with a few problems, I still find it preferable to Windows.
Since this machine acts as my workstation away from home, it’s almost always connected to my VPN, Wireguard. While I still use VSCode, I typically use Eternal Terminal instead of plain SSH on this device. ET is a remote shell that provides resilience against spotty connections and network changes. Unlike SSH, ET can quickly reconnect to the same session after a disconnect, which is great for a frequently roaming client like my laptop.
Android Phone #
My phone is a Samsung Galaxy S20+. Since I love high refresh rates, I bought this phone for its 120hz screen, a feature very few competitors had at the time.
Since this is a phone, it acts more as a consumer of my network’s services than a device I use for building upon it. Nonetheless, apps like Termux, a linux terminal emulator, and WiFiman, a Wi-Fi diagnostic tool, are often useful for troubleshooting.
Software #
This section will cover the software I have running on each of my servers/VMs. This includes their OS and any relevant programs, scripts, or containers.
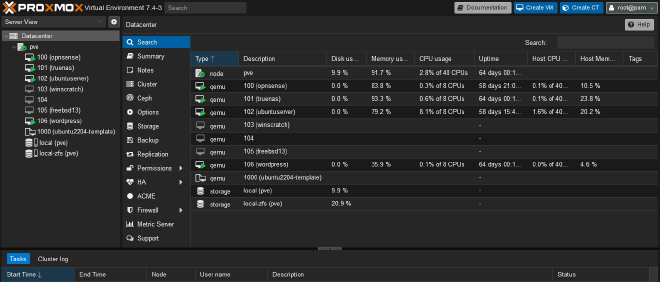
Proxmox #
Proxmox Virtual Environment is an open-source type-1 hypervisor I run on my R530. Underneath Proxmox are several virtual machines (VMs) which run most of the services on my network.
Running my servers as virtual machines under a hypervisor lends many advantages over using multiple physical servers:
- Cost: Running fewer physical servers is cheaper both up front and in the long term when considering the cost of power.
- Flexibility: It’s easy to spin up VMs to try/deploy different OSs like Linux, FreeBSD, and Windows.
- Templates & Clones: By using a template or cloning an existing VM, a new VM can be up and running within seconds.
- Resource Sharing: A large shared resource pool means each VM can leverage more/less resources as needed.
- Snapshots & Backups: Easily saving or restoring a VM’s state (running or not) is great for testing and backups.
There are even more benefits, but this list gets the general idea across.
The remaining sub-sections of Software will cover services running on VMs under Proxmox.
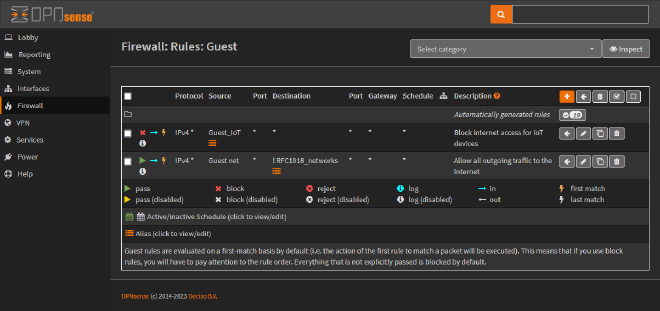
OPNsense #
OPNsense is an open-source FreeBSD-based firewall and router. Besides acting as the default gateway for each of my subnets, it also provides DHCP, DNS, and VPN services to my network.
Sensible auto-creation of routes, NAT rules, and firewall rules give OPNsense functionality similar to a consumer router out of the gate. Despite its ease of use, OPNsense’s feature-set isn’t lacking, and is even further bolstered by its library of community plugins.
OPNsense is highly configurable via both its web interface and REST API. If all else fails, advanced users can SSH into OPNsense’s FreeBSD shell to manage things under the hood.
Unbound DNS #
Unbound DNS is a validating, recursive, caching DNS resolver. Through its integration in OPNsense many features can easily be enabled/configured. For finer control, you can add your own Unbound configuration files alongside those generated from OPNsense’s config.
Aside from resolving DNS requests for other domains, Unbound also serves local DNS entries for my domain. These include both manually created overrides, and ones which OPNsense automatically creates for each DHCP client that supplies a hostname.
I also use Unbound for DNS ad blocking. By returning an answer of 0.0.0.0 for domains that serve ads, Unbound stops client devices from being able to find/load the ads. I have 3 lists of domains configured in OPNsense for which DNS requests are “black holed”:
By blocking the domains on these lists I see very few ads. When combined with the uBlock Origin browser extension, the internet is nearly ad-free.
WireGuard VPN #
WireGuard is a lightweight, performant, and easy-to-use VPN. Installed as an OPNsense plugin, it enables remote access for trusted client devices which leave my house.
By using a VPN when away from home, I’m able to use internal services without completely exposing them to the internet. Since WireGuard is extremely secure, allowing remote access in this way introduces minimal security risk.
Besides allowing clients remote access, I’m also using WireGuard as a site-to-site VPN. With the remote site configured just like any other peer, WireGuard logically links the two networks as if they were connected by a point-to-point link.
TrueNAS #
TrueNAS Core is an open-source FreeBSD-based storage server. It uses OpenZFS for data security and reliability, and supports multiple well-known protocols for network file sharing.
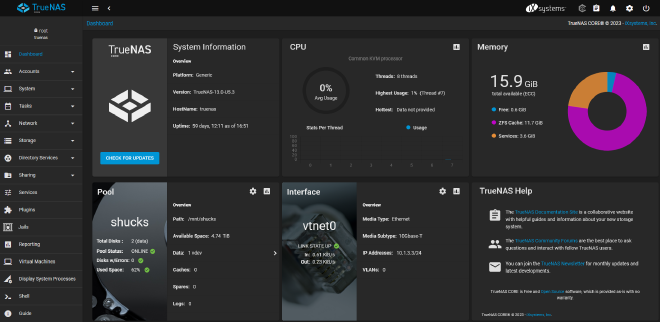
Since I virtualize TrueNAS, my storage drives are connected to an HBA passed through to the TrueNAS VM to give TrueNAS direct access to them. Currently I have two 14TB drives mirrored in pool “shucks”, under which datasets like “media” and “data” store my files.
For sharing datasets to other devices on my network, TrueNAS hosts several NFS and SMB shares. Access to these shares is limited using TrueNAS accounts and/or IP whitelists.
Snapshots #
One of the most powerful features of ZFS is snapshots. Enabled by ZFS’s copy-on-write architecture, snapshots efficiently save a dataset’s state at a point in time. Practically, scheduled snapshots protect against ransomware and accidental data deletion with minimal overhead.
With TrueNAS it’s easy to schedule automated snapshot creation and removal through a cron frontend. Using this system, I have TrueNAS create snapshots hourly, daily, and weekly (kept for 2 days, 2 weeks, and 2 months, respectively).
Ubuntu Server #
Ubuntu Server is the headless server version of linux’s most well known distro. Having limited linux knowledge when creating my first general-purpose server VM, Ubuntu seemed like a good place to start.
This instance of Ubuntu Server (creatively named “ubuntuserver”) runs several services in Docker containers, as well as some scheduled cronjobs. Besides that, it’s also where I work on most of my projects (over SSH). Typically this entails writing/editing Dockerfiles, scripts, YAML, and more with Vim, or running commands from my shell of choice, Bash.
Cronjobs #
I have a few tasks scheduled with cron on ubuntuserver, mostly running scripts I’ve written.
My Porkbun API bash script gets run every 6 hours to ensure the DNS A record pointing to my house is up to date with my public IP. It also runs once a week to keep my wildcard SSL cert up to date.
My Google API IPs python script runs daily to keep an OPNsense alias up to date. You can read more about how I use this script to connect Home Assistant to Google Assistant here.
Docker #
Docker is a
containerization platform/runtime through which I deploy many of the services in my network. The
The Dockerfile and Docker Compose files defining my Docker containers
Dockerfile and docker-compose.yml files I use to deploy these containers are available at the github repository below.
Emby #
Emby is a media server which automatically fetches metadata for your shows and movies. Running Emby’s official Docker image, I can browse and stream my media library through a user-friendly web interface or app (available on most major platforms - iOS, Android, Apple TV, etc).
Using an
HDHomeRun TV Tuner, my Emby container also acts as a DVR, which my family uses to record/watch TV. Emby doesn’t have Live TV commercial detection or skipping built in, but with
this plugin it can read .edl files generated by
Comskip, automatically skipping segments marked as commercials.
Using this Docker image I created, I built a static Comskip binary, which I bind mount in my Emby container. By setting Comskip as the “Recording Post Processing Application” it is automatically run on new TV recordings. Along with the aforementioned plugin, this fully automates commercial detection and skipping in Emby.
UniFi #
The UniFi Network Application allows management of Ubiquiti’s UniFi devices through a webapp. With linuxserver/unifi-network-application alongside a MongoDB container I host it in Docker to manage my UniFi APs.
Home Assistant #
My Home Assistant Docker stack consists of three containers:
- Home Assistant, a smart home control and automation platform.
- Frigate, an NVR with AI image detection.
- Eclipse Mosquitto, an MQTT broker.
The latter two containers are integrated with Home Assistant to expose devices connected through them. Even more devices are connected via Zigbee, which I documented setting up in this post.
Frigate’s AI image detection can be run on any CPU, but I use a more performant Google Coral TPU, which is made available to my virtualized docker host with PCIe passthrough, then bind mounted in the container.
You can see all of my Home Assistant-related posts here.
Traefik #
Traefik is a reverse proxy and load balancer which integrates with docker for automatic/dynamic configuration. With a trusted SSL cert, which it can optionally generate for you, clients open an encrypted connection to Traefik. From here Traefik can route the connection to different endpoints based on many factors.
In my internal network I have multiple DNS entries pointing to Traefik. Based on the hostname clients use to access it, Traefik routes to different services. This means I can open a secure connection to Traefik, which serves a valid cert and routes traffic to my end destinations, removing the need to install a cert on every endpoint.
In the case of other containers, Traefik’s backend connection to these services is done over plain HTTP. Even though this final hop from Traefik to the service isn’t encrypted, it’s done over docker’s networking, where it isn’t subject to attacks or interception by outside attackers.
When routing to services on other VMs, like OPNsense or TrueNAS, Traefik opens an HTTPS connection to them, accepting the self-signed default cert they provide. Technically this isn’t much more secure than just opening an HTTPS connection to them directly on my client, but it’s nice not having to click through the “invalid cert” warning in the browser.
WordPress #
I also host a WordPress website in Docker. Since it has higher uptime requirements than my other containers, this stack is hosted on a separate linux VM. It consists of three containers:
- Traefik, which proxies connections to WordPress and handles SSL cert requests/updates through Let’s Encrypt (This is a different Traefik instance than the one in my main docker stack).
- WordPress, an easy-to-use site builder.
- MariaDB, an open-source database used by the WordPress container.
This WordPress website is used by my sister, Megan. She is the artist behind the beautiful backgrounds used on this site; If you like what you’ve seen so far, go check out more at meganbraunart.com!
Networking #
This section will cover the architecture and policies of my network at layers 2 through 4. The earlier section on OPNsense, my router/firewall, covers application layer network services it provides, like DNS and DHCP.
Subnets/VLANs #
The subnets I use are as follows:
| Subnet Name | Network Address | VLAN | Access | Clients |
|---|---|---|---|---|
| LAN | 10.1.3.0/24 | 1 (Native) | Full | PCs, Phones, Servers, Misc. |
| WireGuard | 172.30.30.0/24 | N/A (VPN) | Full | Remote Laptops, Phones, Etc. |
| Guest | 192.168.10.0/24 | 10 | Internet | Guests’ Devices |
| DMZ | 192.168.20.0/24 | 20 | Internet | Public-Facing Services |
| IoT | 192.168.30.0/24 | 30 | None | Smart Home Devices |
As you can see, I use primarily IPv4 with a subnet mask of /24. While I’ll never have 254 hosts on any subnet, there’s little reason to designate any fewer host bits either, as the
private IPv4 space can more than accommodate any number of /24s I may want.
Another thing to note is that wireless clients on the Guest network aren’t allowed to communicate even with devices on their subnet, a policy enforced by my UniFi APs. Also, outbound NAT is completely disabled on the IoT network to further ensure these devices cannot talk to the internet.
In terms of incoming access, the DMZ network has servers with port forwards (inbound NAT mappings) pointing at them. These ports have wildcard allow rules pointing to them, allowing any host access them.
Subnet Numbering #
When looking at addressing of each subnet, you can see the first two subnets, LAN and WireGuard, are in the 10.0.0.0/8 and 172.16.0.0/12 space, respectively, while the last three are in the 192.168.0.0/16 space, with their third octet corresponding to their VLAN tag.
Having my subnets set up this way helps me more easily parse logs and packet sniffers at a glance. Just from the first few digits of an address I can see if a client is “trusted” (i.e. not on a VLAN), and whether it is coming from a VPN or local connection. Additionally, the third octet of each 192.168 subnet matching the interface’s VLAN tag provides additional clarification as to which VLAN they’re on.
ISP #
My internet connection is supplied by Spectrum, from which I get one IPv4 address and a /56 IPv6 prefix. Both of these are dynamically allocated, and therefore subject to change at any time. This means I have to use dynamic DNS for any public-facing services to remain consistently accessible, more on that in the Ubuntu Server Cronjobs section.
In terms of bandwidth, I get 300 Mbps download and 10 Mbps upload. These low upload speeds make most things I make externally accessible very slow, and due to the lack of competition in my area I don’t see them improving any time soon.
IPv6 #
As you may have noticed, I haven’t talked about IPv6 much thus far. Since I have a dynamically assigned IPv6 prefix, I have been hesitant to implement a fully dual-stack network. IPv6 has a lot of benefits over IPv4, but when your assigned prefix can change at any time, many of those benefits are negated, or worse, turned into problems.
One issue would be updating AAAA DNS records. Since all of my local IPv4 addresses get NAT’d to my public IP when routing to the internet, I only have to keep one public DNS record up to date. With the benefit of IPv6 giving me multiple internet-routable IPs would come the problem of having to update multiple DNS records when my prefix changes. I could use NAT66 to make all my services accessible from a single IPv6 address, leaving only one AAAA record to update, but at that point there’s little benefit to using IPv6 at all.
Another problem comes from my VPN, WireGuard. With WireGuard I have to specify which destination IPs should be routed over the VPN in each client’s config (to be added to their routing tables). Since I want to route only traffic destined to devices in my home network over the VPN, I would have to manually change this config on every client when my prefix changes. I could resolve this using IPv6’s Unique Local Addresses (ULAs) to have a consistent IPv6 space similar to the private IPv4 space, but again, this becomes more work than it’s worth, and makes using IPv6 an additional hassle rather than a benefit.
Due to these issues, I currently have a very basic/incomplete implementation of IPv6 in my network: OPNsense is configured to request a /56 prefix from my ISP, but IPv6 is only enabled on my LAN network, using subnet X:X:X:XX01::/64. With this bare minimum config, clients can use
Neighbor Discovery Protocol (NDP) to discover the subnet’s prefix, then use
stateless address autoconfiguration (SLAAC) to generate their own IPs. Since I don’t have any static IPv6 addresses or AAAA records, these IPv6 addresses are only useful for accessing the internet, not local services.
I wish there was a way to have a static IPv6 prefix through my ISP. If my assigned prefix didn’t change implementing IPv6 in my network would be useful and hassle-free. Perhaps I will navigate the pitfalls of implementing IPv6 with a non-static prefix someday, but for now my half-hearted IPv6 adoption is serving me well enough.
Future Plans #
There’s always more to learn, so my network and servers remain a perpetual work in progress. To end off this post, here’s a few more things I’m planning to implement in the future:
- Scheduled encrypted offsite backups
- Automatic shutdowns during power outages using Network UPS Tools
- 2-3 Host Proxmox High Availability Cluster
- Deployment and Provisioning of VMs with IaC (Terraform/Ansible)
- Windows Server(s) + Active Directory
- Some form of Single Sign-On
- More Cloud and Hybrid-Cloud projects (including an email setup I’m currently working on with AWS and docker)